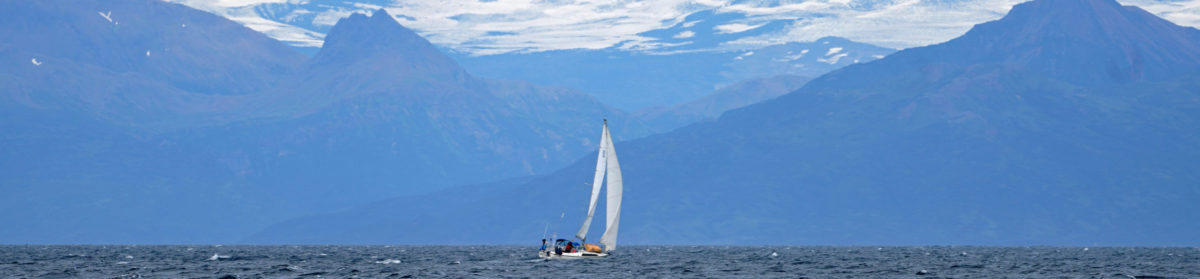

Port Townsend, WA, 15-DEC-2022 – There is function and there is social pressure. Sailing is rife with both. Nonconforming will bring interest from some and the need to point out one’s nonconformity from others.
Salling is also full of individuals who don’t do things the way everyone else does. Like anything from sailing to beekeeping, there are many successful ways to do almost anything, and ways that are better in general and ways that are better in specific circumstances.
Dodgers, biminis, and cockpit enclosures fit, like anything else on a sailboat, into this dynamic.
A dodger, which has different names in different places, is a partial cockpit enclosure that has some sort of windows in the front and sides and a generally short horizontal cover to keep splashing water and rain out of your face in the cockpit and to keep that water from getting down into the cabin. Sailboats don’t come with dodgers as standard equipment.
Most sailboats come with places in the fiberglass deck mold for the dodger to attach and seal.
In today’s world, everything tubular on the sailboat is made of stainless steel. The supports for Dodgers and Biminis and full enclosures and arches to support solar panels radar domes and dinghy davits are all made of stainless steel tubing of various wall thicknesses and outside diameters. There’s no particular reason for this. Various compounds of aluminum tubing will work very well, as will the ubiquitous, and, generally limited to commercial vessels, galvanized steel.
Is not uncommon to pay $10,000 US to have an enclosure built for your boat. The best known, if not the best, of the companies that make these is Iverson’s in Seattle. Their product is very strong, very well made, and required by the company to be made from scratch. Enclosures made by them are easily recognizable by how well they’re made, among other things.
The enclosures we see on Maxi 95s are generally made from stainless steel tubing and a synthetic canvas like Sunbrella.


Maxi 95’s have one problem with both Biminis and enclosures. As the Maxi is designed, the main sheet affixes to the table in the center of the cockpit. This means there can be no uninterrupted roof.
But, if you will only use the enclosure while at anchor you can easily get around this by detaching the main sheet from the traveler and attaching it to the sail tracks that run along the outsides of the cockpit. We attach the main sheet to sail tracks when at anchor or at a dock in order to have nothing above the cockpit. It makes for a very roomy space with an uninterrupted view of the sky above.
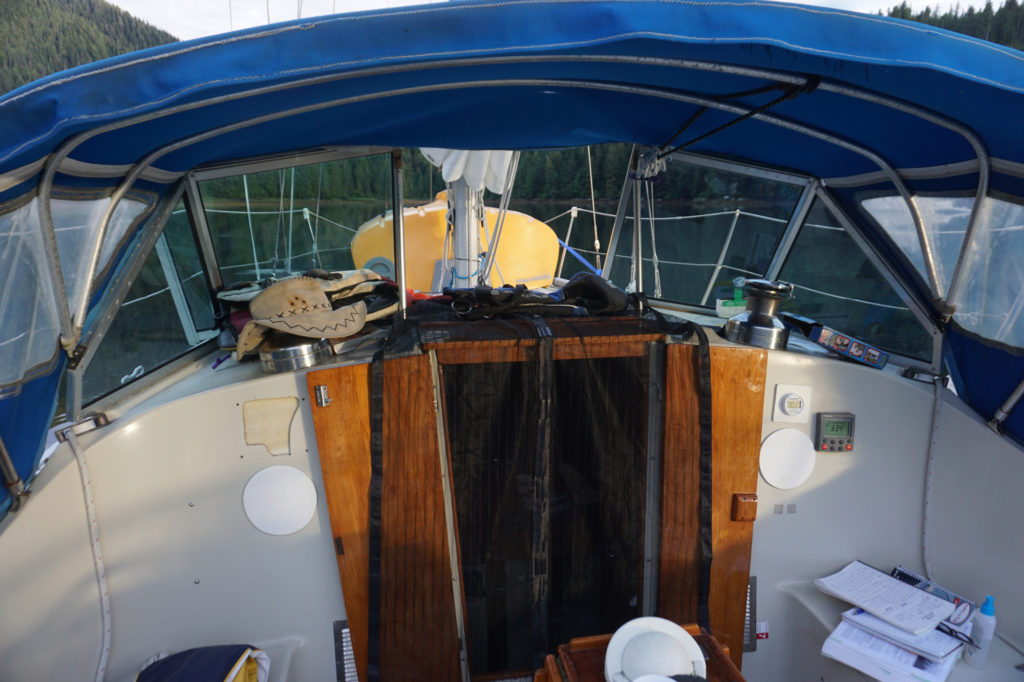
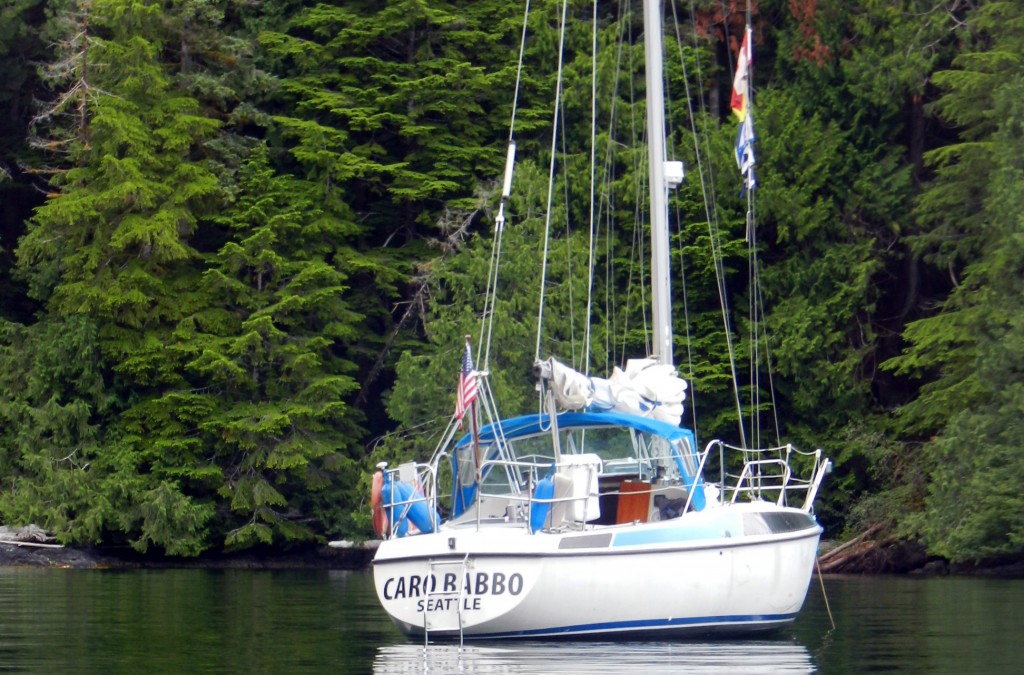
Since the day we bought Caro Babbo, I have wanted an enclosure for the cockpit. I have not liked the heavy stainless steel bows that are necessary to support an enclosure. There is nowhere to put the bows, really, when the enclosure is disassembled. They can either lay flat back towards the stern or somehow lie forward against the dodger. Neither gets them out of the way and there is no way they would work on a passage.
I decided that I would make an enclosure using fiberglass tent poles. The poles are made out of segments of fiberglass rods with metal collars, allowing the segments to be inserted one into the other, creating a pole of whatever length is necessary. The poles are flexible and are usually used to construct dome-type tents.
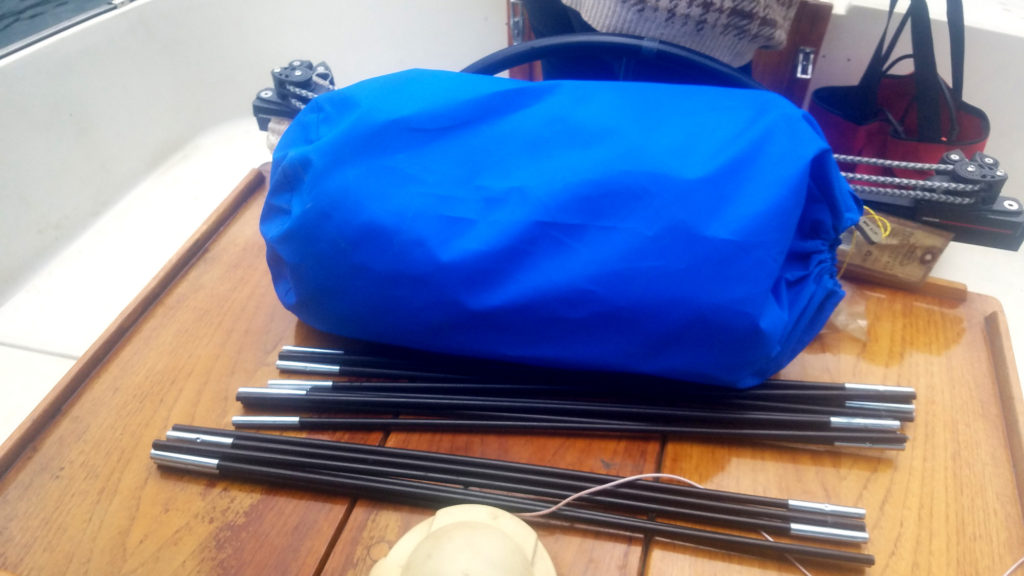
The specific advantage I was after is that they can be disassembled and stored in a small, very lightweight bundle. I wanted to use tent material stretched over the shape formed by flexed fiberglass tent poles. I couldn’t figure out how to attach the ends of the tent poles to Caro Babbo. It was one of the stumbling blocks that kept me from starting to play with this design. I did at one time buy a fair amount of muslin and tent poles in order to start the process.
The years went by and I did nothing. By keeping Caro Babbo on the hard in Northern Enterprises our monthly moorage fee dropped from roughly $400 a month to $100 giving me a surplus in Caro Babbo’s budget.
On the recommendation from Douglas and Morgan from Tumbleweed, I contacted the local Homer canvas worker, Josh Kastelle, and had him over to the Caro Babbo. After eight years of owning Caro Babbo, the dodger was worn, and I’d come to hate the sail cover that came with the boat. I didn’t like the sail cover’s design and, because we were now using offshore-weight sails, the cover was too small.
I contracted with Josh to replace the sail cover and re-cover the dodger and to build Caro Babbo an enclosure made from fiberglass tent poles. It took a little explaining to get across what I wanted: it was a radical diversion from how this is normally done. Josh was on board after not a lot of talk.
In fall 2021, I sent Josh one-half of the money for the projects: $2100. Yes, the whole project was well over $4000. Custom canvas work is very expensive, as are having cushions done, etc. I learned how much the cushions that Jennifer did inside Caro Babbo were actually worth. (See below for comparative costs.)
When I explained when I needed the work done, I somehow thought it would be done across the winter. When I came up to Homer in May none of the work had been started. The sail cover and dodger were quite easy and done within a few days. The tent was more complex.
However, because Josh had not done the work before I arrived, I was able to see the process.
I can’t remember if it was in summer 2021, or spring 2022 that he and I started stretching tentpoles across the cockpit to get a feel for how the construction would work. We ended up using three poles: two forming an X to give height over the central part of the cockpit and a third to push the dome aft.
We hadn’t talked about how we were going to attach these poles to the hull and I had no idea.
This is where it is most helpful to have a professional involved.

In the last week before Caro Babbo was to be splashed, Josh started coming to the boat to fashion the enclosure. Rather than use muslin or any other woven material, there is a type of transparent plastic that is designed specifically for projects like this. He placed the poles about where they should go using tape to keep them in position and then covered the dome in the plastic. Using clamps and magic markers, he mapped out the panels, and then disappeared for a day or so and sewed the whole thing up.

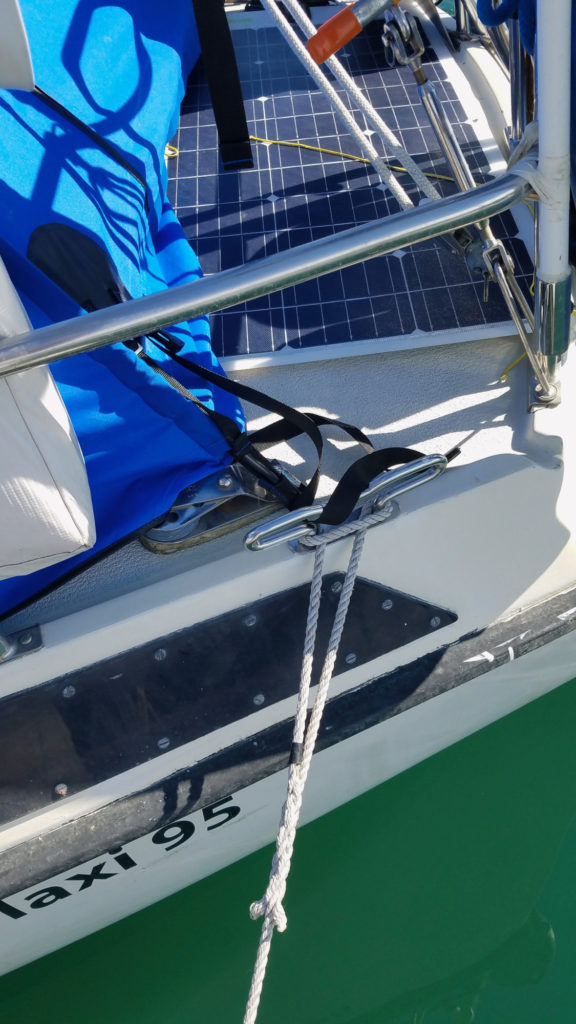
It took Josh a visit or two to understand the mechanics of how the enclosure would actually work. I knew that it would zip onto the dodger at the forward end, across the top and down the sides, but I didn’t have any idea how the end of the poles would work. The answer is quite easy: the end of the poles fit into pockets on heavy nylon straps on the outside of the enclosure. By tensioning the straps, the dome takes its shape. Additional straps, looped around the stern pulpit, hold the enclosure in place.
It is very easily done.
The dome itself is made of a material that is very light and coated on the inside. The entire enclosure when folded up fits into a small bag and weighs less than 6 pounds. It is just what we wanted.
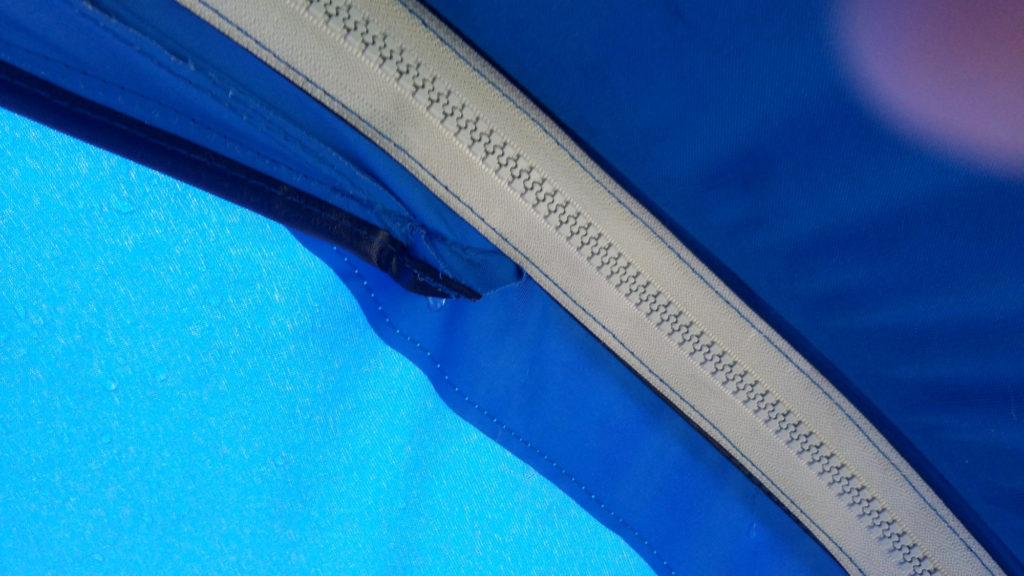
The problem we have had so far is that the needle holes seem to have enlarged and now leak. That this is possibly a design problem worries me. Using Chapstick lip balm we are able to seal all of the leaks. There is an actual design problem where two of the poles terminate near the dodger. Water that travels along the poles terminates in a rivulet of water inside the cockpit. Currently, when it is raining heavily, the cockpit is not easily usable. We hope to have it fixed by summer 2023.
Our largest surprise was discovering when we actually use the enclosure: we pictured using the enclosure when we anchor to have an enclosed space for ourselves and for guests. We’ve used it twice that way. When raining it might be the thing to do, but we found that the enclosure blocks the view of the outside and removes us from any sensation of being in nature. It is not at all what we expected.

However, we have found that in a harbor at a dock the enclosure is an extra room and has a feeling of luxury and privacy. We can sit in the cockpit without being out of doors in the harbor. With the side flaps up we can see out and everyone can see us. With the flaps down there is much more privacy, but also a tremendous feeling of being indoors.
Whether used at anchor, or at a dock, the pathway from the aft cabin to the main cabin is now protected from the weather, and the aft cabin really becomes part of the interior of the boat.
Like any V1 custom project, there are problems, and this one has a problem with the stitching leaking. I’m sure we will get it corrected. However, the enclosure has turned out as well as I had hoped.
While I was preparing to write this article I collected pictures of dodgers for Maxi 95s; Johan Boqvist of the Maxi 95 Matilda, via the Maxi 95 Facebook group, was nice enough to send me pictures of his enclosure both inside and out. (His pictures are in the Photogallery.)
Along the way, I found a company called TecSew. They use computer-aided design (CAD) for their design work. If you’ve had something like a kitchen counter designed, you’ve seen the construction team come with a box to which is attached a string and a stylus. The person using the device stretches the string to all of the corners of the touch points of the counter. The device measures the distance and angle from the device itself. This info is fed into some CAD software which can be transferred to a CNC device to cut the counter, or in the case of TecSew, to develop patterns that their staff can then use to build an exceedingly accurate and custom enclosure. In 2015, a TecSew enclosure for a 28-foot sailing vessel was £4000. Something more than $6000 US at the time.
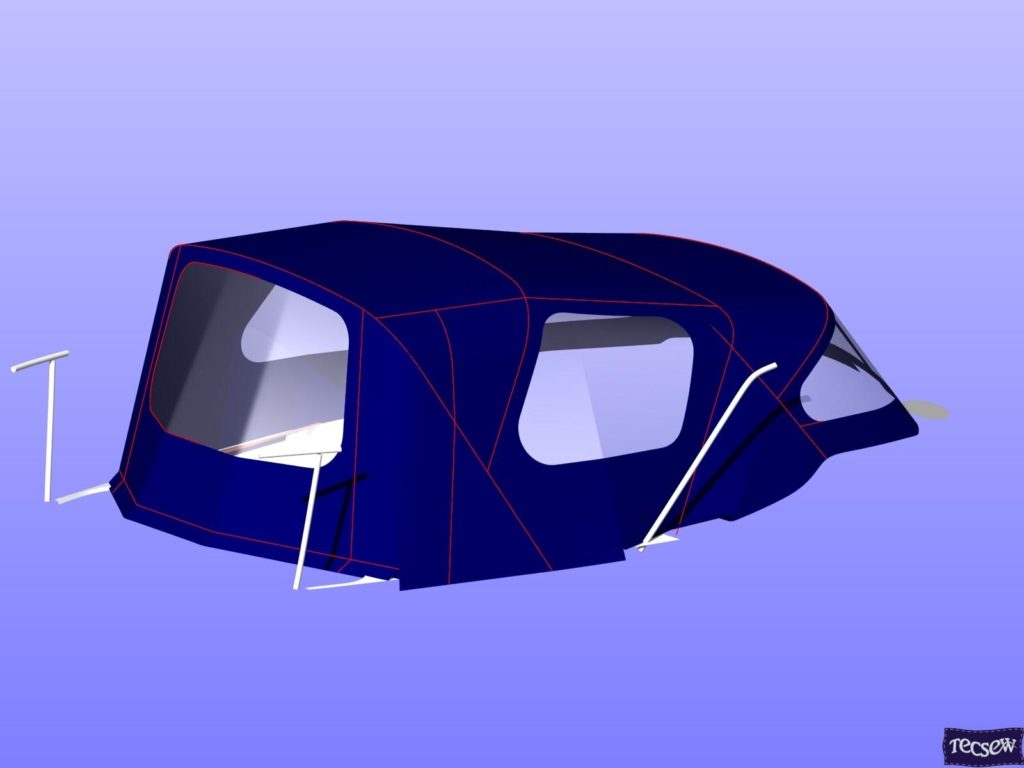
The first problem in using TecSew is that they are in the UK, although they should be able to construct an enclosure for me that would’ve been a perfect fit. The second is that they used traditional stainless steel tubing to construct the structure for the enclosure. Given what I paid for my sail cover, re-covering the dodger, and the enclosure, the TecSew solution was quite a bit more money.
Caro Babbo continues to move forward to become the boat we are after. When I look at pictures of the vessel when we bought her, and how she looks now, the difference is quite startling. It is clear that she has become an offshore sailing vessel and one that its owners spend a lot of time aboard. She was so clean and nimble looking when we bought her, now she carries the armor of battling weather and sea. It startles me how little is unchanged… But that is a future post.
As always, it was a pleasure to see your post come up on my notifications. Looking forward to reading about your projects and adventures in the future. To you and yours have a merry Christmas, and a happy healthy New Year.
Thank you, Pete.
Have a wonderful Holiday Season.